Yes, you absolutely can convert 4K to 1080p, and it's a common, often necessary, practice for many video creators, editors, and casual users. While 4K offers stunning detail, its massive file sizes and demanding playback requirements can be a significant hurdle. Downscaling to 1080p allows for wider compatibility, easier sharing, and faster editing without necessarily sacrificing a noticeable amount of visual quality for most viewing scenarios. But here's the crucial detail: the quality of your 1080p output depends entirely on the conversion method, software, and settings you choose. Simply reducing resolution isn't enough; you need to understand how to preserve visual fidelity during the process.
⚡ Quick Verdict:
- ✅ Yes for improving compatibility, reducing file size, and faster editing/uploading
- ⚠️ Maybe for archival purposes (depends on codec/bitrate settings for future use)
- ❌ No if original, uncompressed 4K detail is non-negotiable for future-proofing
- 👉 Key Factor: Codec, bitrate, and scaling algorithms are crucial for maintaining perceived quality
Why Convert 4K to 1080p? The Practical Advantages
Converting your high-resolution 4K footage down to 1080p (Full HD) isn't just about saving space; it offers a multitude of practical benefits that enhance your workflow and viewing experience. Understanding these advantages helps you decide when downscaling is the right move for your projects.
1. Enhanced Compatibility and Playback
Not all devices, platforms, or even older software can handle the immense data rates and processing power required for 4K video.
- Older Devices: Many older TVs, smartphones, tablets, and even some gaming consoles might struggle to play 4K video smoothly, leading to stuttering or buffering. 1080p is universally supported.
- Web Platforms: While YouTube and Vimeo support 4K, streaming 4K requires a robust internet connection. For viewers with slower internet, offering a 1080p version ensures a smoother playback experience.
- Editing Software: Even powerful editing suites can bog down when dealing with multiple tracks of 4K footage, especially on mid-range computers. Editing with 1080p proxies or directly with 1080p files significantly improves performance.
2. Reduced File Sizes and Storage Requirements
4K video files are notoriously large. A single minute of 4K footage can easily consume hundreds of megabytes, quickly filling up hard drives and cloud storage.
- Storage Savings: Converting to 1080p can reduce file sizes by 50-75% or more, depending on the compression settings. This means you can store more videos on your devices and extend the lifespan of your storage solutions.
- Faster Transfers: Smaller files transfer faster, whether you're moving them between drives, uploading to cloud storage, or sending them to collaborators.
- Cloud Costs: If you rely on cloud storage, smaller files can mean lower monthly costs.
To illustrate the difference, consider the typical file sizes for common video formats and resolutions:
| Video Resolution | Typical Bitrate (Mbps) | Approximate File Size per Minute (GB) |
|---|---|---|
| 4K (3840x2160) | 50-100 | 0.375 - 0.75 |
| 1080p (1920x1080) | 10-20 | 0.075 - 0.15 |
| 720p (1280x720) | 5-10 | 0.037 - 0.075 |
Note: These are estimates. Actual file sizes vary greatly with codec, frame rate, and compression settings.
3. Faster Uploads and Downloads
If you're sharing videos online, either for clients, social media, or personal use, the upload speed of your internet connection becomes a bottleneck.
- Social Media: Most social media platforms compress uploaded videos anyway. Uploading a 1080p file can be significantly faster, and the platform's re-compression might even look better than if you uploaded a massive 4K file that gets heavily crunched.
- Client Delivery: Delivering 1080p files is quicker and easier for clients to download and review, especially if they don't have top-tier internet speeds.
- Streaming: For live streaming, sending a 1080p stream is less demanding on your internet bandwidth, reducing the chances of dropped frames or quality degradation.
4. Improved Editing Performance
Even if your computer can handle 4K, editing with 1080p files or proxies often leads to a smoother, more responsive editing experience. This is particularly true for complex projects with multiple video tracks, effects, and color grading. Less processing power is needed, allowing for real-time playback and quicker rendering.
Can You Convert 4K Video to 1080p? (People Also Ask)
Yes, absolutely! Converting 4K video to 1080p is a standard process known as downscaling or transcoding. Modern video editing software and dedicated conversion tools are highly efficient at performing this task. The key is to understand that while you are reducing the pixel count from 3840x2160 (4K) to 1920x1080 (1080p), the quality loss can be minimal or even imperceptible, especially when viewed on a 1080p display.
The process involves resampling the image, essentially taking the information from the higher resolution and intelligently mapping it to the lower resolution. Good conversion algorithms use sophisticated methods to ensure details are preserved as much as possible, preventing aliasing or pixelation.
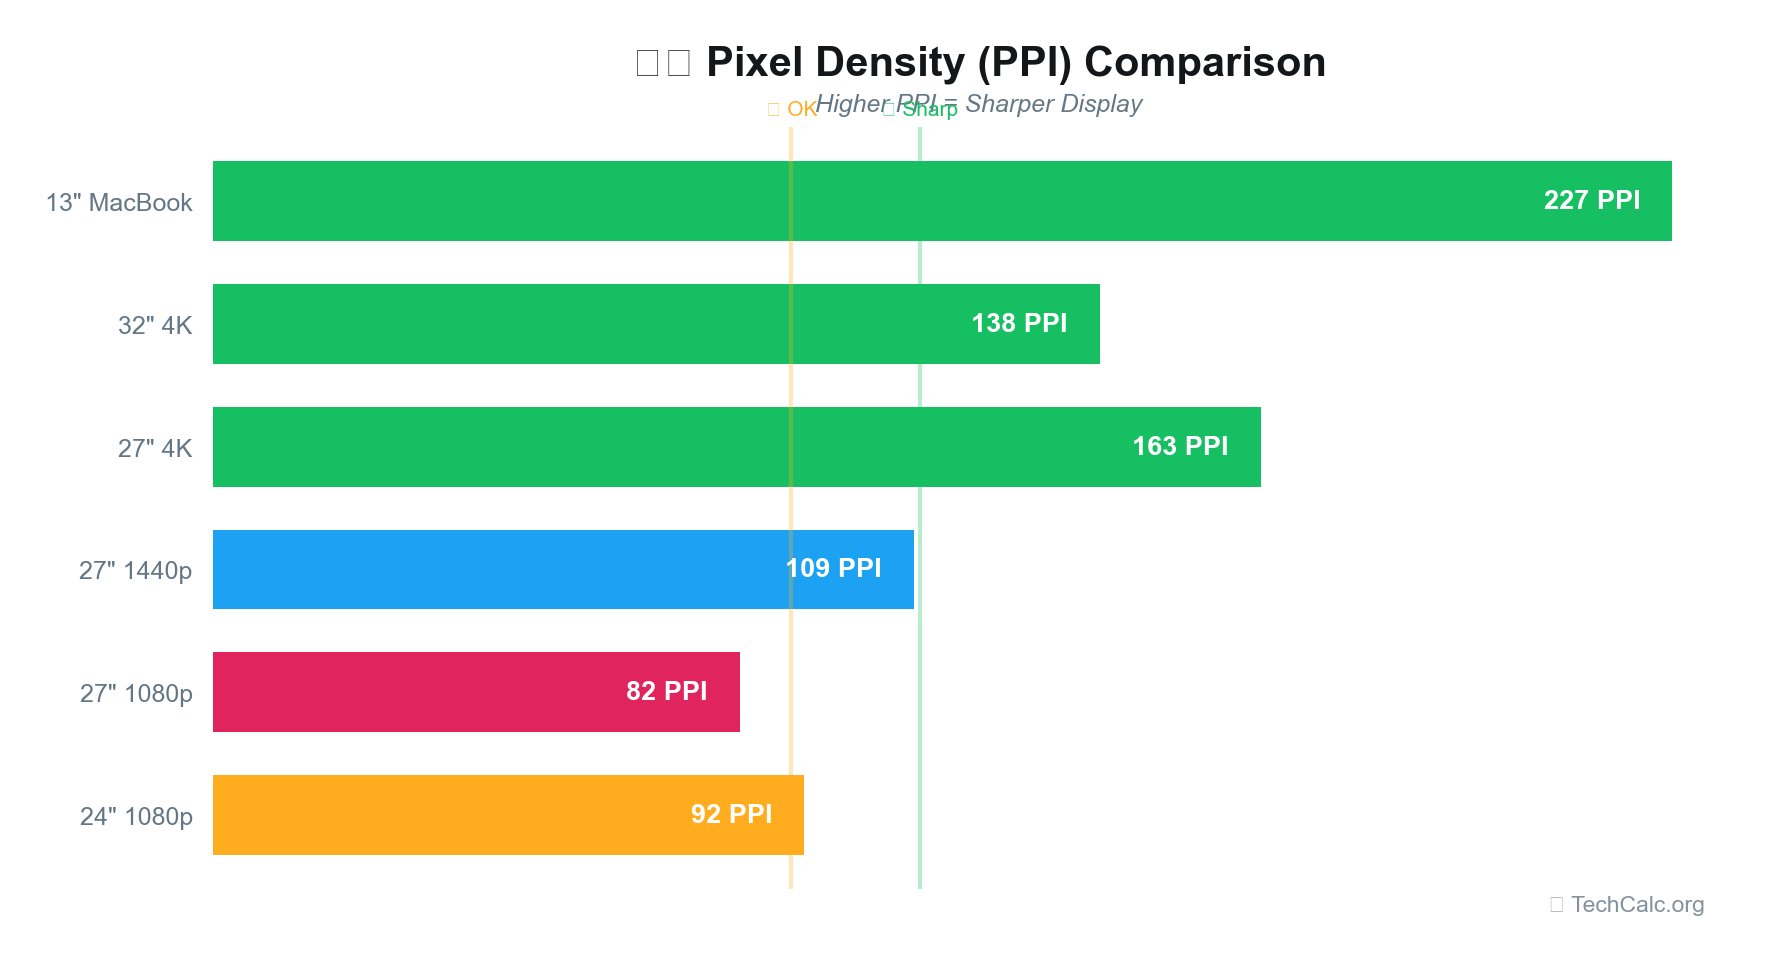
The Role of Pixels Per Inch (PPI)
When you convert 4K to 1080p, you're directly affecting the total pixel count. However, how this impacts the perceived quality also depends on the display size and your viewing distance. This is where Pixels Per Inch (PPI) becomes relevant.
A 4K image on a small screen might have a very high PPI, making individual pixels indistinguishable. The same 4K image downscaled to 1080p and viewed on a larger screen might still look fantastic if the PPI is sufficiently high for your viewing distance. Our PPI Calculator can help you understand how different resolutions appear on various screen sizes and at different viewing distances. For instance, a 1080p video on a 27-inch monitor might have a PPI around 81, which is perfectly sharp for typical desktop viewing.
You can also explore specific resolutions like 4K resolution details to see how pixel density changes with screen size.
How to Convert 4K to 1080p: Step-by-Step
The general process for downscaling 4K video to 1080p is quite similar across most software. Here's a simplified breakdown:
- Import Your 4K Video: Open your chosen software and import the 4K video file(s) you wish to convert.
- Create a New Project/Sequence (Optional but Recommended): In video editors, create a new project or sequence with 1080p (1920x1080) resolution settings. This ensures your output matches your target.
- Place Video on Timeline/Add to Converter: Drag your 4K video onto the 1080p timeline, or add it to the conversion queue in a dedicated converter. The software will automatically scale the 4K footage to fit the 1080p frame.
- Adjust Output Settings: This is the most critical step for quality.
- Resolution: Select 1920x1080 (1080p) as the output resolution.
- Codec: Choose a modern, efficient codec like H.264 (AVC) or H.265 (HEVC). HEVC offers better compression at lower bitrates but might have slightly less compatibility.
- Bitrate: This determines the data rate and directly impacts quality and file size. For good quality 1080p, a bitrate between 10-20 Mbps is often sufficient. Higher bitrates mean larger files but better quality, especially for fast-moving scenes. Experiment to find a balance.
- Frame Rate: Keep the original frame rate (e.g., 24fps, 30fps, 60fps) unless you have a specific reason to change it.
- Audio: Keep original audio settings or choose a high-quality option like AAC at 192kbps or 256kbps.
- Start Conversion/Export: Initiate the conversion process. This can take anywhere from a few minutes to several hours, depending on your computer's power, video length, and chosen settings.
- Review Output: Always watch a portion of your converted 1080p video to ensure the quality is acceptable and there are no unexpected artifacts.
Key Factors for Quality Retention
When you convert 4K to 1080p, the goal is to retain as much perceived quality as possible. Here's what matters most:
- Source Quality: A high-quality 4K source (well-exposed, sharp, low noise) will always yield better 1080p results than a poor 4K source.
- Downscaling Algorithm: Most professional software uses high-quality algorithms (like Lanczos or bicubic) that intelligently average pixels to create a sharp, clean 1080p image.
- Bitrate: As mentioned, a sufficient bitrate is crucial. Don't go too low, or you'll introduce compression artifacts (macroblocking, banding) even if the resolution is 1080p.
- Codec: H.264 is widely compatible, while H.265 offers better compression efficiency but requires more processing power for encoding/decoding.
- Post-Conversion Sharpening (Use Sparingly): Some software offers sharpening filters. Use these very subtly, if at all, as over-sharpening can make the video look artificial or introduce artifacts.
What Software Converts 4K to 1080p? (People Also Ask)
There's a wide array of software available to convert 4K to 1080p, ranging from free, open-source tools to professional video editing suites. Your choice will depend on your budget, technical skill, and specific needs.
Free & Open-Source Options
These are excellent starting points for casual users or those on a budget.
-
HandBrake:
- Pros: Free, open-source, highly versatile, excellent compression, supports a wide range of input/output formats, cross-platform (Windows, macOS, Linux). Great control over codecs, bitrates, and advanced settings.
- Cons: Can be daunting for beginners due to the sheer number of options.
- Best for: Users who want detailed control over their conversions and are comfortable with a slightly steeper learning curve.
-
VLC Media Player:
- Pros: Free, cross-platform, primarily a media player but has basic conversion capabilities. Simple interface for quick conversions.
- Cons: Limited control over advanced settings compared to dedicated converters. Quality might not be as optimized as HandBrake.
- Best for: Quick, no-frills conversions without needing fine-tuned control.
-
DaVinci Resolve (Free Version):
- Pros: Professional-grade video editing software with a robust free version. Offers excellent control over export settings, including codecs, bitrates, and scaling algorithms. Powerful color grading and editing tools if you need more than just conversion.
- Cons: Designed for editing, so it's a more complex tool if you only need conversion. Can be resource-intensive.
- Best for: Users who also want powerful editing capabilities and professional-level control over their output.
Paid & Professional Software
For those who need more features, faster performance, or are already invested in a professional workflow.
-
Adobe Media Encoder:
- Pros: Industry-standard, integrates seamlessly with Adobe Premiere Pro and After Effects. Offers a vast array of presets, highly customizable export settings, and batch processing. Excellent quality.
- Cons: Subscription-based (part of Adobe Creative Cloud).
- Best for: Professionals already using Adobe products, needing batch conversions and high-quality output.
-
Wondershare UniConverter:
- Pros: User-friendly interface, fast conversion speeds, supports a huge range of formats, includes additional features like video downloading, DVD burning, and basic editing.
- Cons: Paid software.
- Best for: Users who want an all-in-one video toolkit with ease of use and good performance. (This is a common tool highlighted by competitors, so it's good to mention it).
-
Movavi Video Converter:
- Pros: Very intuitive and easy to use, fast conversion, good quality output, includes basic editing tools.
- Cons: Paid software.
- Best for: Beginners or casual users who want a straightforward, reliable converter without the complexity of professional editing software.
-
Final Cut Pro (macOS only):
- Pros: Apple's professional video editor. Excellent performance on macOS, intuitive interface, powerful export options.
- Cons: Mac-exclusive, one-time purchase but at a premium price.
- Best for: Mac users already in the Apple ecosystem who need professional editing and conversion capabilities.
Online Converters
For very small files or occasional use, online converters can be convenient.
- Pros: No software installation needed, accessible from any device with a browser.
- Cons: Often have file size limits, slower conversion speeds (rely on internet upload/download), less control over advanced settings, potential privacy concerns with uploading sensitive footage.
- Examples: CloudConvert, Zamzar, Convertio.
- Best for: Quick, small file conversions when you don't have access to desktop software.
Understanding the Difference: 4K vs. 1080p
To truly appreciate the benefits of downscaling, it's helpful to grasp the fundamental differences between 4K and 1080p resolutions.
| Feature | 1080p (Full HD) | 4K (Ultra HD / UHD) |
|---|---|---|
| Resolution | 1920 pixels wide x 1080 pixels high | 3840 pixels wide x 2160 pixels high |
| Total Pixels | ~2.07 million pixels | ~8.3 million pixels |
| Pixel Count | 1x | 4x the pixels of 1080p |
| Aspect Ratio | Typically 16:9 | Typically 16:9 |
| Common Name | Full HD, FHD | Ultra HD, UHD |
| File Size | Moderate | Very Large |
| Compatibility | Universal across most devices and platforms | Requires modern hardware and good internet for streaming |
| Viewing | Sharp on most screens up to 32-40 inches | Noticeably sharper on larger screens (40+ inches) or close viewing |
The jump from 1080p to 4K represents a fourfold increase in the total number of pixels. This means a 4K image contains significantly more detail. However, this detail is only fully appreciated on a display capable of rendering those extra pixels and when viewed at an appropriate distance.
When NOT to Convert 4K to 1080p
While converting 4K to 1080p offers many advantages, there are specific scenarios where you should absolutely retain your original 4K footage.
- Archival Purposes: If your 4K footage is precious and needs to be preserved in its highest possible quality for the long term, always keep the original 4K master files. You can always downscale a copy later, but you can't upscale 1080p back to true 4K without quality loss.
- Future-Proofing: Technology evolves. What seems like overkill now (e.g., 8K or even higher resolutions) might become standard in the future. Keeping 4K originals ensures your content is ready for future display technologies.
- Heavy Cropping or Zooming: One of the major advantages of shooting in 4K is the ability to crop or zoom into a shot in post-production without losing quality when outputting to 1080p. If you plan to do significant reframing, you need the extra pixel data of 4K.
- Visual Effects (VFX): For complex visual effects work, having the highest resolution possible provides more detail for tracking, rotoscoping, and compositing, leading to more realistic results.
- Client Requirements: If a client specifically requests 4K deliverables, then you must provide them. Always clarify client expectations regarding resolution.
- Exhibition on Large 4K Displays: If your content is destined for large format 4K screens (e.g., cinema, digital billboards, high-end home theaters), then maintaining 4K resolution is essential for impact.
Tips for the Best 4K to 1080p Conversion
To ensure your downscaled 1080p video looks as good as possible, keep these tips in mind:
- Shoot High Quality in 4K: Start with the best possible 4K footage. Good lighting, proper focus, and low noise in your original 4K will yield superior 1080p results.
- Use a Good Codec: For the output, stick to efficient codecs like H.264 (AVC) or H.265 (HEVC). H.265 generally offers better compression for the same quality or better quality for the same file size.
- Choose a Sufficient Bitrate: Don't skimp on bitrate. For 1080p, a variable bitrate (VBR) between 10-20 Mbps is a good starting point for most content. For very detailed or fast-moving scenes, you might go higher.
- Maintain Original Frame Rate: Unless you have a specific creative reason, keep the output frame rate the same as the source (e.g., 24fps, 30fps, 60fps). Converting frame rates can introduce motion artifacts.
- Avoid Double Compression: If your 4K footage is already heavily compressed, try to avoid re-compressing it multiple times. Each compression pass can degrade quality.
- Check Aspect Ratio: Ensure your output aspect ratio remains 16:9 (or whatever your source 4K was) to avoid stretching or distorting the image. Our Aspect Ratio Calculator can help you understand and manage different video dimensions.
- Test and Compare: Always convert a small clip first with different settings. Compare the output to your original 4K (if possible) and adjust settings until you achieve the desired balance of quality and file size.
- Consider Your Audience's Viewing Environment: Most people watch videos on phones, tablets, or 1080p monitors/TVs. For these common viewing platforms, a well-converted 1080p video will look indistinguishable from 4K for many viewers.
Conclusion: Making the Smart Choice for Your Video
Deciding to convert 4K to 1080p is a practical decision driven by compatibility, storage, and workflow efficiency. While 4K offers undeniable pixel density, its demands often outweigh its benefits for everyday use and delivery. By intelligently downscaling your footage, you can achieve a high-quality 1080p video that is easier to manage, share, and play back across a wider range of devices, all while significantly reducing file sizes.
Remember, the key to successful conversion lies in using the right tools and understanding crucial settings like codec and bitrate. Don't be afraid to experiment with the recommended software and settings to find the perfect balance for your specific projects. And for those times you need to understand how resolution impacts viewing quality on different screens, don't forget to use our PPI Calculator to get precise insights. Make 2026 the year you master your video resolutions!